The strategy looked flawless. On the chart, every arrow lined up: clean entries, tidy exits, an equity line climbing neatly from left to right. Then you traded it with real money — and it bled. If that story sounds familiar, the problem usually isn't your idea. It's that the idea was never actually tested; it was admired.
A backtest is how you find out whether a strategy has a real edge or just looked good in hindsight. Done properly it isn't a single chart you eyeball — it's a repeatable process: fix your rules, feed them clean history, run them mechanically, and, most importantly, check the result on data the strategy has never seen. This guide walks that whole process end to end, carrying one small worked example the entire way, so you finish with an actual go/no-go decision instead of another pretty chart.
Key Takeaways
A valid backtest fixes the rules in advance, runs over enough data across enough market conditions, and — the step most people skip — validates on data the strategy was never tuned on.
Read metrics as a set: expectancy and reward-to-risk decide whether a system makes money, so a sub-50% win rate can still be profitable.
Overfitting is the main way DIY backtests lie — catch it with the trades-per-parameter rule, too-good-to-be-true metrics, and in-sample vs out-of-sample degradation.
A passed backtest earns a forward test on live data, never a straight jump to full size.
Table of Contents (24 min read)Contents
What Actually Counts as a Valid Backtest
There's a wide gap between testing a strategy and flattering it. Scrolling back on a chart, spotting the trades you would have taken, and tallying up imaginary profit is not a backtest — it's hindsight with a scoreboard. Your eye quietly skips the losers and remembers the winners, and the result tells you nothing about the future.
A valid backtest clears three bars. First, the rules are fixed in advance — every entry and exit is mechanical, so you (or a machine) couldn't cheat even if you wanted to. Second, it runs over enough data across enough market conditions that the result isn't a fluke of one calm uptrend. Third — and this is the one almost everyone skips — it's validated on data the strategy was never tuned on. Miss that last bar and you haven't measured an edge; you've measured how well you fit the past.
The full sequence looks like this, and the rest of this guide is one step per stage:
The process at a glance
The backtest process, end to end
1
Write the rules precisely
Fix entries, exits, position size and stop as exact, non-negotiable conditions.
2
Choose clean historical data
Enough history to cover trending, ranging and volatile market regimes.
3
Run the backtest
Replay bar by bar by hand, or drive the rules through software.
4
Split in-sample vs out-of-sample
Tune on one slice, then validate on data the strategy has never seen.
5
Read the metrics honestly
Win rate, profit factor, expectancy, drawdown and sample size together.
6
Make the go/no-go call
Passed? Forward-test on live data before you risk real capital.
Each step feeds the next — skip the split and the whole test loses its meaning.
Step 1 — Write Your Strategy Rules Down Precisely
Before you touch any data, your strategy has to become a set of instructions a stranger could follow and land on the exact same trades you would. Vague rules produce vague results — and worse, they let you unconsciously tune the outcome later.
Pin down every condition without wiggle room: what triggers an entry, what closes the trade for a win, what closes it for a loss, and whether anything filters the setup (a session window, a trend condition, a news blackout). If a rule secretly depends on your judgment in the moment — "I'd probably wait for confirmation here" — it can't be backtested. Either make the judgment explicit or drop it.
Two inputs must be stated up front as fixed, already-decided values, not things you tune during the test: your position sizing and your stop-loss placement. You're testing a strategy at a defined risk level — say, risking a fixed fraction of the account per trade with the stop at a set distance — not searching for the risk settings that flatter the curve. How to designthose risk rules is a separate discipline; here they're givens the test inherits. This is exactly the discipline that automating a strategy forces on you: an EA or a bot will not run "I'd probably wait" — it runs only what you wrote.
Step 2 — Choose the Right Historical Data
A backtest is only as trustworthy as the history you feed it. Two things matter: the quality of the data and how much of it (and what kind) you use.
For quality, pull reliable OHLCV data — open, high, low, close and volume — from a reputable source: your broker's own feed, your charting platform's built-in history, or an established market-data provider. A random spreadsheet off a forum, or a feed riddled with gaps and bad ticks, will invent trades that never could have happened.
For coverage, the data has to include the conditions your strategy will actually meet. A trend-following rule that only ever saw a smooth bull run hasn't been tested — it's been coddled. Aim for enough history to span trending, ranging, and volatile or news-driven periods, so you learn how the strategy behaves when the market stops cooperating. And you need enough trades, not just enough time: a slow strategy might need many years of data to produce a meaningful count.
One realism check separates honest tests from fantasy: model your costs. Spread, commission, and slippage all eat into every trade, and a backtest that assumes perfect fills at the exact price will overstate a fast strategy badly. If your tool lets you set trading costs, set them to something realistic — a frictionless test is a fairy tale.
Step 3 — Run the Backtest: Manual Replay vs. Automated
There are two ways to actually run the test, and the right one depends on the strategy and where it's headed.
Manual chart replay means stepping through history one bar at a time with the future hidden, taking each trade your rules dictate, and logging the outcome by hand. It's slow, but it builds real intuition for how the setup behaves and it works when some rules are hard to fully mechanize. Automated backtesting hands the rules to software — a strategy tester built into MT4/MT5 or a charting platform, or a scripted backtester — which runs thousands of trades in seconds and strips out the human bias about which trades you'd "really" have taken.
A simple rule of thumb: replay a handful of trades manually to sanity-check that your rules do what you think, then run the full history automated — especially for anything you'll eventually hand to a bot. Automation has a second payoff that matters for the next step: it lets you re-run the entire test instantly when you change a single parameter, which is exactly what a proper in-sample/out-of-sample split demands.
Step 4 — Split the Data: In-Sample vs. Out-of-Sample
This is the step that separates a genuine edge from a lucky curve-fit, and it's the one competing guides tend to wave at rather than explain. The idea is simple: never judge a strategy on the same data you used to build it.
Divide your history into two parts. The in-sample slice is the data you're allowed to look at, experiment on, and tune. The out-of-sample slice you seal in an envelope and don't touch. You develop and optimize the strategy using only the in-sample data; then, exactly once, you run the frozen rules over the out-of-sample data. If the performance roughly holds, the edge might be real. If it falls apart, you fit noise — and you just found that out for free instead of with your account. A common split is around 70/30 or 80/20, oldest data in-sample and the most recent held out.
A single split has one weakness, though: the result depends on where you happened to cut. Get unlucky with the boundary and a good strategy looks bad, or a bad one looks fine.
Walk-Forward Optimization, Explained
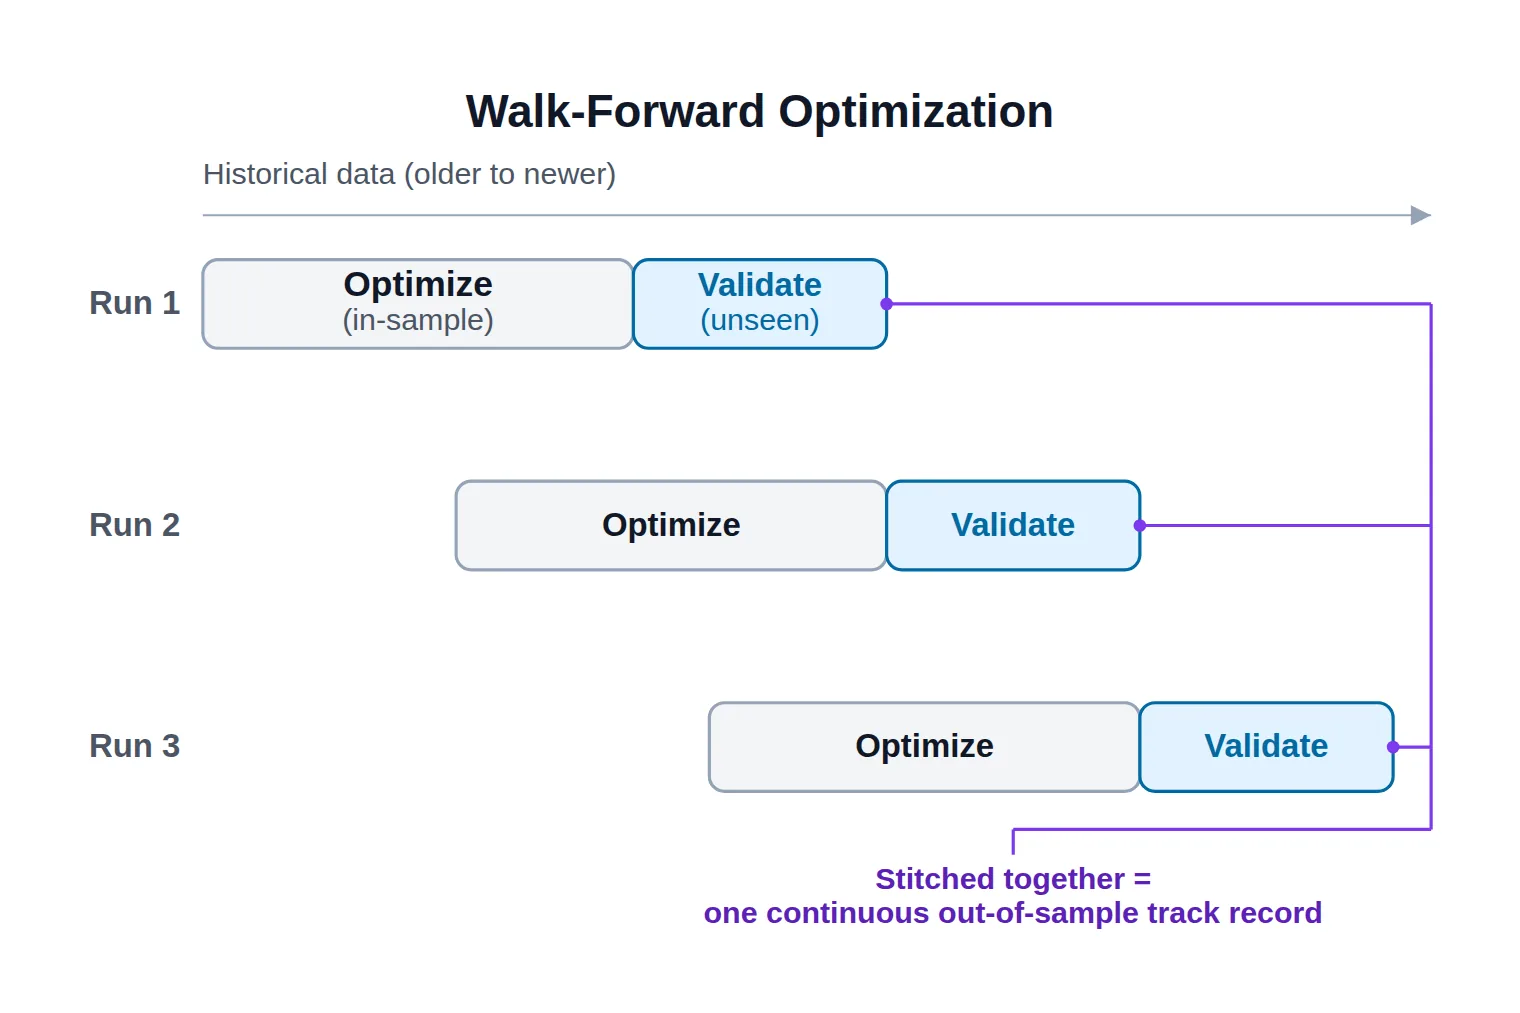
That weakness is exactly what walk-forward optimization removes. Instead of splitting once, you roll the window forward. Optimize on a chunk of in-sample data, validate on the next untouched chunk, then slide both windows forward and repeat — again and again across the whole history. You stitch every out-of-sample chunk into one continuous track record that reads like "how the strategy would have traded, live, the whole way through."
Because each validation window is always data the strategy was never tuned on, walk-forward is about as honest as a backtest gets. It's more work, but for anything you plan to trade with real size — or automate — it's the difference between a hopeful guess and a tested one.
The diagram below makes those rolling windows concrete: follow how the optimize block and the validate block step forward together, run after run, so each validation always lands on a stretch of history the strategy was never tuned on.
Walk-forward rolls the optimize and validate windows forward together, so each test always lands on unseen data.
Step 5 — Read the Results Correctly
Producing numbers is easy; reading them without fooling yourself is the hard part. Let's make it concrete. Suppose you're testing a simple EMA-pullback rule set on 18 months of daily data — 12 months in-sample to build it, the last 6 months sealed as out-of-sample — with realistic trading costs switched on. Here's the out-of-sample scorecard that comes back:
Read every metric together
Worked example — EMA pullback strategy (out-of-sample)6-month out-of-sample window · 240 trades
Trades (sample size)
240
Win rate
47%
Profit factor
1.42
Expectancy / trade
+0.19R
Max drawdown
14%
Sharpe ratio
0.9
Recovery factor
2.1
In→out-of-sample drop
11%
A sub-50% win rate still makes money here because the average winner outsizes the average loser and expectancy stays positive.
Notice what this scorecard is telling you: the win rate is below 50%, yet the strategy is profitable. That's not a contradiction — it's the whole point of reading metrics together instead of one at a time.
The Metrics That Actually Matter
Take them as a set, never in isolation:
Win rate — the share of trades that win. On its own it's almost meaningless: a 90% win rate that books tiny gains and the occasional catastrophic loss still bleeds money.
Profit factor — gross profit divided by gross loss. Above about 1.3 over a large sample is workable; sitting near 1.0 means you're basically breaking even before you even account for the costs you might have under-modeled.
Expectancy — the average profit per trade, ideally expressed in R (multiples of the amount risked). This is the number that actually decides whether the system makes money. Positive expectancy over a large sample size is the entire game.
Maximum drawdown — the worst peak-to-trough fall in the equity curve. The real question isn't the number, it's whether you could sit through it without abandoning the strategy at the bottom. It's worth running the drawdown-recovery math, because a deep drawdown needs a disproportionately larger gain just to climb back to even.
Risk-adjusted return — how much return you earned per unit of volatility. One common measure here is the Sharpe ratio; treat it as one signal among several, not a verdict on its own.
Reward-to-risk — pair the win rate with the average reward-to-risk. A modest win rate at a healthy R:R beats a high win rate at a poor one; if you're unsure how those combine, test the win-rate and R:R together before trusting the equity line.
Read this way, the worked example makes sense: 47% winners, but winners bigger than losers, positive expectancy, a drawdown you could plausibly stomach, and — crucially — barely any degradation from in-sample to out-of-sample. That last point is where the next question lives.
Is Your Backtest Overfit?
Overfitting — also called curve-fitting — is when you tune a strategy so tightly to past data that it memorizes noise instead of learning a pattern. The backtest looks spectacular; live, it's useless. It's the single most common way a do-it-yourself backtest lies, and detecting it is a skill in itself. Four checks catch most of it.
1. The trades-per-parameter rule. Every parameter you optimize — a moving-average length, a threshold, a stop distance — needs a healthy number of trades behind it, or you're just fitting randomness. A widely used floor is roughly 30 trades per tuned parameter. Work out the minimum for your own strategy:
Try the numbers
How many trades does my backtest need?
The more parameters you tune, the more trades you need behind them before the result means anything. Set your parameter count and see the floor.
Tunable parameters in the strategy
Trades required per parameter
Minimum trades to trust the test
—
Comfortable floor (2×)
—
Fewer trades than the minimum means your metrics are describing luck, not an edge.
2. Metrics that are too good to be true. A dead-straight equity line, almost no drawdown, an implausibly high risk-adjusted return — the market simply isn't that generous. Suspicious perfection is a symptom, not a triumph. Real edges are lumpy and uncomfortable.
3. In-sample vs. out-of-sample degradation. This is the sharpest tell. Line up the same metric on both slices. A small drop from in-sample to out-of-sample is normal and healthy; a collapse — the edge roughly halving, or crossing from profit into loss — means the in-sample brilliance was fitted, not found.
The overfit strategy's edge evaporates on unseen data — 2.8 down to 0.9, below the 1.0 break-even line — while the robust one barely moves.
4. Robustness checks. Nudge a parameter slightly and re-run: a genuine edge degrades gracefully, while an overfit one shatters at the smallest change. Going further, a Monte Carlo simulation — reshuffling the order of your trades or resampling them thousands of times — shows whether your result sits inside a believable range of outcomes or was one lucky sequence you'd never repeat.
Healthy vs. Red-Flag Backtest: A Fast Self-Check
Before you trust any result — your own, or the track record published for a trading bot you're considering — scan it against the two columns below. The left is what a trustworthy backtest looks like; the right is where a lot of blown accounts quietly began.
Scan before you trust
Healthy backtest
Red-flag backtest
Hundreds of trades across several market regimes
A few dozen trades in one type of market
Metrics roughly hold on out-of-sample data
Great in-sample, collapses out-of-sample
Few parameters, each with a reason to exist
Many parameters, tuned until the curve looked perfect
A steady, believably lumpy equity curve
A suspiciously smooth, straight-up line
Spread, commission and slippage modeled
Zero costs and perfect fills assumed
A drawdown deep enough to be realistic
Almost no drawdown anywhere
Modest win rate paired with solid reward-to-risk
Very high win rate hiding tiny wins and huge losses
Every red flag is the same mistake wearing a different mask: making the past look better than the future can be.
Read the two columns together and a single theme emerges. None of the red flags are random — they're all ways, conscious or not, of making history look kinder than reality. The healthy column is simply what's left when you stop letting the test cheat.
From Backtest to a Live Decision
A backtest has exactly one job: to hand you a decision. All the numbers above collapse into a small number of gates, and either the strategy passes them or it doesn't.
Turn the numbers into a decision
Go / no-go: should this strategy move toward live?
Take itProceed with careSkip / stand aside
Passing the backtest earns permission for the next step — never a straight jump to full size.
Passing isn't a promise; it's permission to take one more step — and that step is never "go all in." The required bridge is a forward test: run the frozen rules as a paper trade on live, real-time data for a meaningful stretch, and confirm the live behavior matches the backtest — the fills, the spread, the slippage as they actually happen in the wild. Only once the live paper results line up do you start with small real size. No backtest, however clean, removes the risk of live trading — read the risk warning before you commit capital.
Forward testing is the bridge, but it's only the first plank of it. Turning a validated idea into something you actually run live is a discipline of its own: wiring up a reliable data feed, building the execution layer that places the trades, and adding the controls that scale size up only as real results earn it. That is where a backtested strategy graduates into a working system — so once yours has cleared its forward test, walking through how to build a quantitative trading system end to end is the natural next step.
The strategy that looked flawless on the chart deserves one honest question before your money does: did it hold up on data it had never seen? You now have the full process to answer that — and the discipline to walk away when the answer is no.
FAQ
How much historical data do I need to backtest a strategy?
Enough to cover several different market conditions and to produce a large number of trades — not just a long calendar span. A fast intraday strategy might get hundreds of trades from a year or two of data, while a slow swing strategy could need many years to reach the same trade count. Judge by the number of trades and the variety of regimes (trending, ranging, volatile), not by the date range alone.
Is backtesting enough to go live, or do I still need to forward test?
Backtesting alone is not enough. A backtest runs against history the market has already resolved; live trading introduces real-time fills, changing spreads, and slippage a backtest can only approximate. After a strategy passes its out-of-sample test, forward-test it — paper-trade the exact rules on live data for a while — and confirm the live results match before risking real money.
What's the difference between in-sample and out-of-sample testing?
In-sample data is the portion of history you're allowed to build and optimize the strategy on. Out-of-sample data is a slice you seal off and never touch during development, then run the finished rules against exactly once. If the strategy performs on data it was never tuned on, its edge is far more likely to be real rather than curve-fit to the past.
How do I know if my backtest is overfit?
Look for a few tells: too few trades behind each tuned parameter, results that look too perfect (a straight equity line, almost no drawdown), and a big drop in performance from in-sample to out-of-sample. A robust strategy holds up when you slightly change a parameter or reshuffle the trade order; an overfit one falls apart at the first disturbance.
Can I backtest a strategy without coding or software?
Yes — manual chart replay lets you step through history bar by bar with the future hidden, taking each trade by hand and logging the outcome. It's slower and better suited to a modest number of trades, but it needs no code. For large samples, walk-forward testing, or anything you plan to automate, dedicated backtesting software is far more practical and removes human bias about which trades you'd have taken.
Does a high backtest win rate mean the strategy is good?
Not by itself. Win rate is only meaningful alongside the average size of wins versus losses. A strategy can win 90% of the time and still lose money if the occasional loss dwarfs the frequent small wins. Expectancy — the average profit per trade — and reward-to-risk tell you far more about whether the strategy actually makes money than win rate ever will.
Sources & Further Reading
Want to go deeper? These independent, authoritative sources shaped this guide — each one is worth reading in full:
The Cross-Market Desk is the SignalBots editorial team for topics that span every market — platform connectors, copy trading, partnership and IB programs, and the general mechanics of trading automation. We research and write the guides that apply no matter what you trade.



Discussions 0
Leave a comment